You’ve priced seed packets, a raised bed kit and a few bags of soil, and the total has you wondering whether a vegetable garden is worth the money, or whether you’ll quit by July.
This guide shows you how to start a vegetable garden in 7 steps, with the costs, the soil checks and the crop math laid out up front.
UF/IFAS Gardening Solutions says saving money by growing food at home is “possible, but challenging.” That’s why this plan starts with what you own, borrow or swap, and spends last.
This guide draws on University Extension, USDA and US Department of Transportation sources, checked as of October 2026.
To start a vegetable garden, choose a spot with at least 6 hours of direct sun, start small with one bed or a few containers, test your soil before adding compost, plant a few crops you actually eat when your frost dates allow, then water, mulch, and harvest often.
How to Start a Vegetable Garden: 7 Steps at a Glance
- Pick a sunny, easy-to-reach spot
- Start small and choose a garden style
- Test your soil, then build it
- Choose crops that earn their space
- Time your planting around your frost dates
- Plant and mulch your first beds
- Water, protect, harvest, and keep notes
Before You Start a Vegetable Garden: Can It Really Save You Money?
You’ve probably seen claims that a garden will cover its own costs in one season. Savings depend on what you grow, what you spend and whether you keep going, and none of it is promised.
UF/IFAS guidance for a vegetable garden on a budget is practical: grow what you eat, start from seed, use seed exchanges and library seed banks, save seeds, and preserve any surplus. Seed saving and home compost reuse what you already have, so they cost little or nothing.
Free-first rule: Use what you own, then borrow, then swap, and buy only what’s left. Start small, since a smaller bed costs less to fill and is easier to finish the season with.
Growing food is one lever. You can also cut your grocery bill by looking at what you already buy.
Step 1: Pick a Sunny, Easy-to-Reach Spot
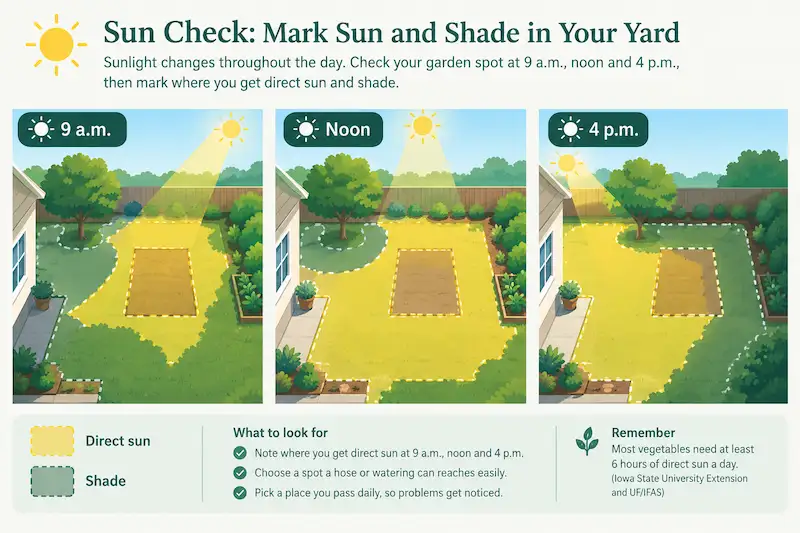
Stand where you’d like the garden at 9 a.m., noon and 4 p.m. Sun is the first filter for a vegetable garden, and checking it is free. A good spot now saves you from moving beds later.
Beginner guides give different hour counts, so the callout below uses Extension figures. Here is SustainCents’ own simple method, not sourced guidance: on one clear day, note which parts of your spot sit in direct sun at each of those three times.
- Sun check: Note direct sun at 9 a.m., noon and 4 p.m.
- Near water: Choose a spot a hose or watering can reaches easily.
- In sight: Pick a place you pass daily, so problems get noticed.
How much sun do vegetables need? Most vegetables need at least 6 hours of direct sun a day, according to Iowa State University Extension and the UF/IFAS Florida Vegetable Gardening Guide. Some crops tolerate partial shade, but a shadier site narrows your choices. Your county Extension office can confirm what your crops need in your region.
Safety note: Before digging deep, call 811. The U.S. Department of Transportation says a call a few days ahead gets buried utility lines marked.
No yard? Containers on a sunny patio or balcony work too, and Step 2 covers them.
Step 2: Start Small and Choose a Garden Style
You’re standing in your yard with a tape measure. The pull is to mark off a big plot, but a smaller first garden is easier to finish. Recommended sizes vary by guide. Iowa State Extension calls about 100 square feet (10 by 10 ft) a manageable start and says many new gardeners do better starting smaller, such as 4 by 8 ft (32 square feet). You can expand next year once you know how much time you have.
Keep beds no wider than about 4 ft so you can reach the middle without stepping on the soil. Raised beds need to be deep enough for roots, and your county Extension office can tell you what suits your crops.
For containers, start with what you own. You can reuse containers you already own once you’ve checked they’re food-safe, and use only ones that drain. Iowa State Extension suggests containers at least 10 in. across and compact varieties.
| Style | Free-first start | Trade-offs | Lead (see Step 3) |
|---|---|---|---|
| In-ground | Smother or remove grass where you are | Most digging; you get the soil you have | Test first, see Step 3 |
| Raised bed | Reuse or borrow a frame | Framing and fill can add cost; beds warm and dry faster in spring | Test the fill, see Step 3 |
| Containers or grow bags | Reuse food-safe pots you own | Limited root space, so choose compact crops | Check the fill, see Step 3 |
Buy only after your soil result is in.
Step 3: Test Your Soil, Then Build It
Before you buy a single bag of compost, think about what’s already in your soil.
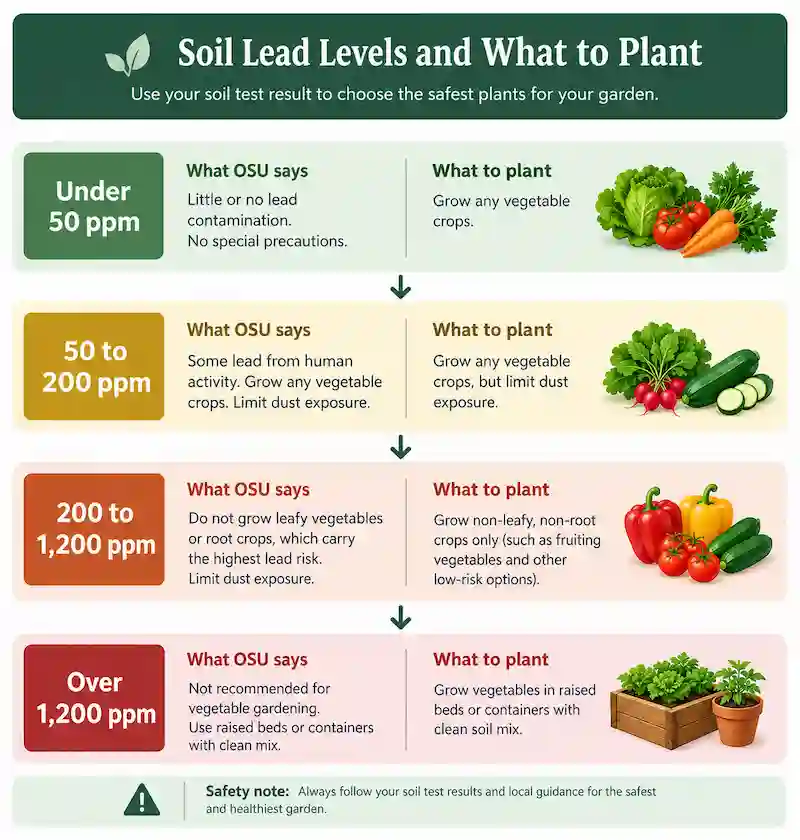
Do I need a soil test? Yes. Test before you buy soil or plant, especially in an older home or where children will be in the garden. Lead occurs naturally at about 10 to 50 ppm, so your result tells you which row of the table below applies to your garden.
How to test
Oregon State University Extension (EC 1616, published 2016, reviewed 2025) puts natural soil lead at about 10 to 50 ppm and says soil near older houses is more likely to carry lead from old paint. For a garden, collect 15 to 20 subsamples from the surface to 6 in., mix them, and ask the lab for a total-metals test.
County Extension offices and private labs both test soil, and fees vary by state. As one example, the University of Minnesota Soil Testing Laboratory lists a lead test at $23 per sample in its 2026 prices. Confirm the lab’s method before you pay.
What your result means
| Total lead (ppm) | What OSU says |
|---|---|
| Under 50 | Little or no lead contamination. No special precautions. |
| 50 to 200 | Some lead from human activity. Grow any vegetable crops. Limit dust exposure. |
| 200 to 1,200 | Do not grow leafy vegetables or root crops, which carry the highest lead risk. Limit dust exposure. |
| Over 1,200 | Not recommended for vegetable gardening. Use raised beds or containers with clean mix. |
OSU notes the US has no garden-soil lead standard. The main exposure is dust on unwashed produce, and the FDA does not recommend soaking produce or using soaps. OSU’s easier-to-wash list includes tomatoes, peppers, beans, cucumbers, squash, kale and potatoes. Lettuce, spinach, carrots and radishes are harder to wash well.
Safety note: For a high result, contact your county Extension office and your local health department. This is general information, not medical advice.
Build soil without spending much
Start free. Iowa State University Extension says smothering grass with cardboard or newspaper removes sod without digging, and that fall is a good time to start for spring planting. Then work compost into the top layer of soil. If you already compost kitchen scraps indoors, finished compost can be a free soil amendment. If you buy compost or fill, OSU advises asking whether it was tested for metals.
Step 4: Choose Crops That Earn Their Space
Look at your last grocery receipt. Which vegetables did you buy twice?
Rule one is to grow what you eat, a point UF/IFAS makes directly. Rule two is arithmetic: value per 10 ft = yield (lb) × average retail price ($/lb). The table sorts eleven crops by that value.
| Crop | lb per 10 ft | $/lb | Value per 10 ft |
|---|---|---|---|
| Summer squash | 15 | 1.77 | $26.55 |
| Spinach | 4 | 6.44 | $25.76 |
| Kale | 7.5 | 2.23 | $16.73 |
| Cucumbers | 10 | 1.56 | $15.60 |
| Lettuce | 7.5 | 1.82 | $13.65 |
| Bush beans | 4.5 | 2.97 | $13.37 |
| Potatoes* | 15 | 0.85 | $12.75 |
| Carrots | 10 | 0.92 | $9.20 |
| Radishes | 4 | 1.69 | $6.76 |
| Green peppers* | 5 | 1.07 | $5.35 |
| Tomatoes | 2 | 1.67 | $3.34 |
*Calculated by SustainCents from the UF/IFAS yield and price inputs.
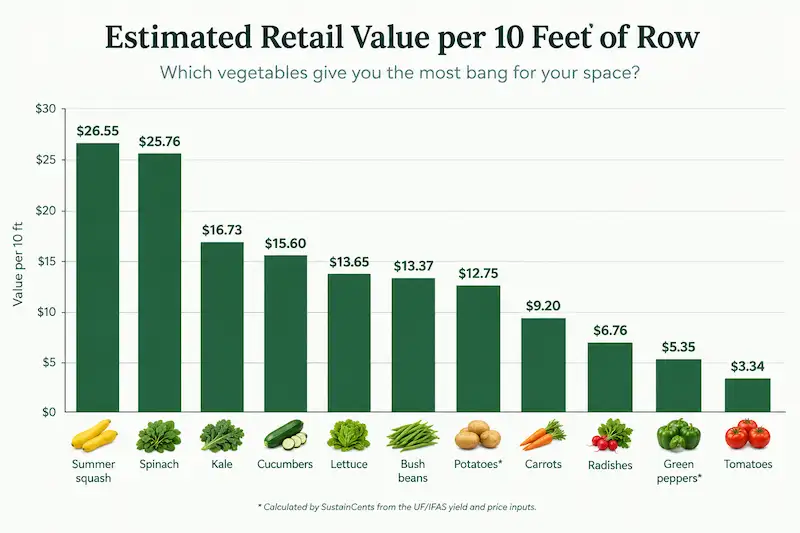
Prices are 2025 averages for non-organic produce sold in the Southeast US, from USDA Agricultural Marketing Service data as reported by UF/IFAS, and yields are Florida-based. Swap in your own store prices. Value also says nothing about effort or time. Tomatoes land last because the UF/IFAS Florida Vegetable Gardening Guide lists just 2 lb per 10 ft for supported plants. For prices beyond the Southeast, the USDA Economic Research Service reports average retail prices per pound from retail scanner data, most recently 2023.
Crop choice matters: spinach is worth about 3.8 times radishes per 10 ft ($25.76 ÷ $6.76). If your lead result is 200 to 1,200 ppm, OSU advises avoiding leafy greens and root crops, which leaves summer squash, cucumbers, bush beans, green peppers and tomatoes in this table.
Worked example (illustrative): Lettuce $13.65 + kale $16.73 + bush beans $13.37 + cucumbers $15.60 = $59.35 for 10 ft of each at full success, or about $30 at 50% success. The 50% is an assumption, not data, so read the range as $30 to $59. It assumes your soil result allows leafy greens and 10 ft of row per crop (40 ft total).
Step 5: Time Your Planting Around Your Frost Dates
If you’re reading this in fall, you’re not late. You’re early. Your average last and first frost dates set the schedule, and your county Extension office can give you both. The USDA National Agricultural Library points beginners to Extension agents for vegetable gardening questions.
Cool-season crops tolerate light frost and usually mature before summer heat. Warm-season crops are damaged by freezing, so they wait until frost danger passes, per Iowa State Extension. Planting at the wrong time wastes seed money.
| Cool-season | Warm-season |
|---|---|
| Lettuce | Summer squash |
| Radishes | Green peppers |
| Kale | Tomatoes |
To avoid one large harvest, sow again as you go. Iowa State Extension suggests planting crops such as lettuce, radishes, carrots and beans every 7 to 10 days.
Region check: Frost dates, USDA zones, water rates and fees vary by state and region, so confirm local dates with your county Extension office.
When should I start a vegetable garden? Start after your area’s last frost for warm-season crops, and earlier for cool-season crops that tolerate light frost. In fall, you can plan, test soil and clear a bed for spring. Your county Extension office can give your average frost dates.
Starting in fall
Count back from your average first frost to find a sowing date, as Iowa State University Extension’s fall planting guide explains. In Iowa, that points to summer sowing, so a late-October start may be too late in cold regions. In mild-winter regions, the UF/IFAS Florida guide lists fall through winter as a main window for cool-season crops. Planting windows depend on your region, so use fall for groundwork and check your Extension office before sowing.
Step 6: Plant and Mulch Your First Beds
It’s planting day, and the temptation is to cram in everything. Crowded plants compete, and extra seed costs money. Follow the seed packet or plant tag for depth and spacing, and sow sparingly so your seed lasts.
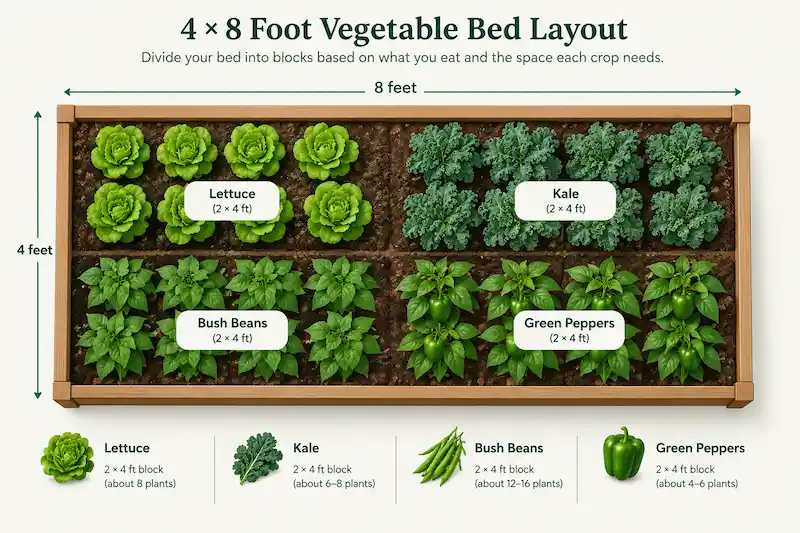
Illustrative layout: divide a 4 by 8 ft bed into four labeled blocks, such as lettuce, kale, bush beans and green peppers, and size each block by how much you eat. Plant each block when its season allows. The Step 4 dollar example uses 10 ft of row per crop and isn’t tied to this layout.
- Check the tag or packet for depth and spacing before you plant.
- Harden off any transplants first, which means exposing seedlings gradually to outdoor conditions.
- Plant one block at a time, and stop before the bed feels crowded.
- Mulch right after planting. The UF/IFAS Florida guide names fallen leaves, straw and unfinished compost as mulches, and says mulching helps control weeds. Leaves you already have cost nothing.
Step 7: Water, Protect, Harvest, and Keep Notes
It’s midsummer and you’re standing in the garden holding a colander. First, water. University of Minnesota Extension says a vegetable garden needs about 1 inch of water a week from rain and watering combined, and mulch helps soil hold it. One inch over 100 square feet is 62 gallons, so your water bill is a real cost.
How often should I water? Once a week is often enough in soil that holds moisture, and sandy soil may need watering twice a week, according to University of Minnesota Extension. Dig down: if the soil is dry 2 inches below the surface, water. Rain counts toward the weekly total.
Protect plants from pests and wildlife with fencing or covers, and ask your county Extension office about local problems. Soaker hoses, drip lines and trellises are optional. Sticks and scraps can support climbing crops.
Harvest often, and wash produce under cold running water, as OSU advises. If more ripens than you can eat, freeze or preserve the surplus instead of letting it spoil.
Once harvest starts, use the whole vegetable so stems and leaves don’t go to waste.
Each week:
- Check soil moisture by hand.
- Look for pests and damage.
- Harvest what’s ready.
Notes template, one line per entry:
- Planting date, harvest weight, spend, and what you’d change next year.
What Your First-Year Vegetable Garden Really Costs
Add up your receipts the way you would for any other budget line.
What is the cheapest way to start? The lowest-cost route is to start small, use what you own or borrow, plant from seed, test your soil, and fill beds with your own compost or cardboard before buying soil. Check seed exchanges and library seed banks first, as UF/IFAS advises.
| Line item | Free-first path | Buy-everything path | Price (US, as of October 2026) |
|---|---|---|---|
| Seeds/plants | Seed swap or library, saved seeds | Packets and transplants | Price not verified |
| Bed/containers | Reuse, borrow | Kit or lumber | Price not verified |
| Soil/compost | Own compost, cardboard | Bagged soil | Price not verified |
| Soil test | County Extension | Private lab | Free-first: example university lab lead test, $23 per sample (University of Minnesota, 2026 prices; fees vary by state); Buy-everything: Price not verified |
| Tools | Borrow | New | Price not verified |
| Mulch | Leaves, cardboard | Bagged | Price not verified |
| Water | Rain plus tap | Drip kit | Price not verified (volume reference: 62 gallons per 1 inch over 100 square feet, University of Minnesota Extension) |
| Supports/fencing | Sticks, scraps | Trellis, fencing | Price not verified |
Use three formulas:
- First-year net = harvest value minus total spend
- Harvest value = yield per 10 ft × price × (row-feet ÷ 10) × success rate
- Seasons to pay off = one-time cost ÷ annual net savings
Here is an illustration. The Step 4 four-crop plan is worth $30 to $59 at 50% to 100% success. Subtract your real ledger total. If your buy-everything total is higher than your harvest value, year one is net negative.
Water rates, soil-test fees and Extension services vary by state. Savings aren’t assured. They are most likely when you go free-first, grow what you eat and finish the season.
Your Next Step
You now know how to start a vegetable garden in 7 steps: pick a sunny spot, start small, test your soil, choose crops you eat, time planting to your frost dates, plant and mulch, then water, protect, harvest and keep notes. Do one thing this week: check the sun at 9 a.m., noon and 4 p.m. It costs nothing and tells you where your first bed belongs. Write down what you find, since it starts your first-year notes.
Vegetable Garden FAQ
Seeds usually cost less per plant. UF/IFAS calls starting from seed the most inexpensive way to grow plants, and seed exchanges and library seed banks can make seed free. Transplants cost more per plant, so log both in your ledger and compare your real spend after year one. Either way, buy only what you will plant.