That roll of plastic wrap runs out at the worst moment, and you’ve started wondering whether DIY beeswax wraps made from fabric you own could replace it. Germany’s Federal Institute for Risk Assessment (BfR) says in its September 2023 FAQ that it doesn’t recommend jojoba oil in beeswax cloths, so the simplest recipe leaves jojoba out. That’s German guidance, not a US rule.
You’ll get five steps for homemade beeswax wraps, free-first materials, what to wrap and skip, a fill-in cost formula and care tips. Here, “safely” means careful materials, careful heat and wraps kept to suitable foods, not a guarantee.
This guide draws mainly on public regulator pages and one US federal food-safety post, checked in November 2026. SustainCents hasn’t tested these recipes.
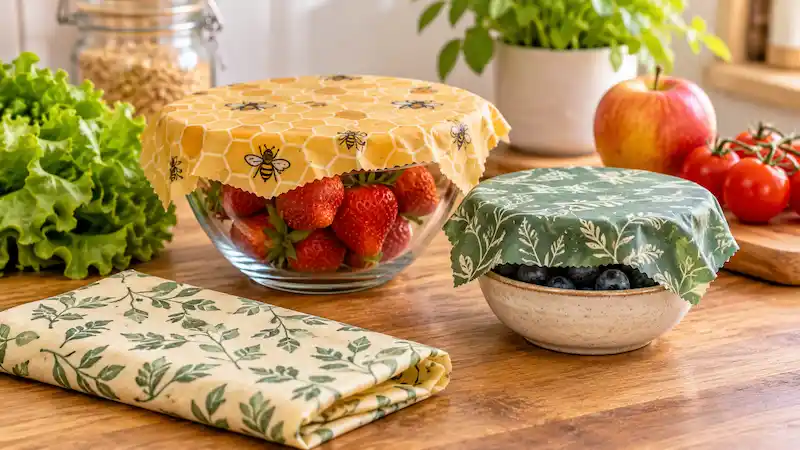
To make DIY beeswax wraps, cut undyed cotton fabric, melt food-grade beeswax onto it on a lined pan, spread the wax evenly, let it cool, then test and trim. Use the wraps on fruit and vegetables, not raw meat, fish or eggs, and wash them by hand in cool water.
How to Make DIY Beeswax Wraps in 5 Steps
Here is how to make beeswax wraps from undyed cotton and food-grade wax in five steps:
- Cut undyed cotton fabric to size.
- Line a baking sheet with parchment and warm the oven.
- Scatter food-grade beeswax over the fabric and melt it.
- Spread the wax evenly, then lift the fabric to cool.
- Test the wrap, trim the edges and fix dry spots.
What you need, free options first
You probably own the fabric already. The question is whether it’s the right fabric for food.
| Need | Free or low-cost first | Skip or caution |
|---|---|---|
| Fabric | 100% cotton fabric you own ($0), washed and undyed | Dyed remnants such as curtains can transfer dye to food (BfR, 2023) |
| Beeswax | Food-grade beeswax pellets or a grated block; ask the seller for purity documentation | Wax must meet food-additive requirements (BfR, 2023); skip cosmetic grade |
| Oils and resins | None | Skip jojoba oil (BfR, 2023); skip resin as a precaution |
| Tools | Parchment paper, a baking sheet and tools you won’t use for food again ($0 if you own them) | None |
| Optional | Pinking shears, an oven thermometer | None |
The Finnish Food Authority flagged pesticide residues, paraffin adulteration with mineral oils and fabric treating agents in 2023, so undyed cotton is a precaution, not proof. Colored or printed cotton, such as an old shirt or curtain, is better kept away from homemade beeswax wraps, and it can still go into textile upcycling projects like tote bags and patchwork.
The five steps in detail
Step 1, cut and wash: Wash the cotton first, then cut it. Home recipes often use about 7 to 8, 10 to 11 or 13 to 14 inches.
Step 2, set up: Line the pan with parchment paper and set the oven to the lowest setting that melts your wax. Home recipes disagree widely, from about 150°F to 300°F, so don’t copy a number. A 2015 safety data sheet (SDS) from US supplier Dadant & Sons lists beeswax melting at 62 to 65°C (143.6 to 149°F), which is a melting point, not an oven setting.
Step 3, melt: Use beeswax only, with no jojoba oil or resin. Home recipes suggest about 0.4 to 1 oz of wax per 12 by 12 inch wrap (illustrative). Scatter it over the fabric, then start melting in the oven.
Step 4, spread: Melt the wax briefly, watching the pan. Spread it evenly out to every edge, then lift the fabric by the corners while the wax is still warm, wearing oven mitts.
Step 5, test: Let it cool, then fold a corner to see if it holds. Add wax to dry spots and re-melt, then trim the edges.
Hot wax and oven safety
- Never melt wax over an open flame, and never leave the oven unattended.
- Keep oven mitts and a lid or baking sheet within reach.
- Don’t rinse melted wax down the sink, because wax can harden and clog drains.
- If you smell gas, leave and call your gas utility or 911.
- If the oven won’t hold a low, steady temperature, call a licensed appliance technician. If a drain clogs with wax, call a licensed plumber.
If a wrap turns out wrong
Most fixes reuse moves from steps 2 to 5.
- Uneven coverage: Re-melt briefly, spread the wax again and add wax to bare spots.
- Too much wax: Re-melt briefly, lift the fabric so the extra runs off, then trim the edges.
- Stiff or flaking: Re-melt briefly, spread the wax again and trim loose edges.
Are DIY Beeswax Wraps Safe? What to Wrap and What to Skip
Picture a wrap that touched raw chicken last week. Can you really clean it?
Wraps suit certain plant foods, and no one can promise zero risk. SustainCents found no US federal rule written specifically for beeswax wraps (as of November 2026). The most specific guidance comes from BfR and the Finnish Food Authority, which notes no legislation specific to this material (2023), and both are EU context, not US law.
| Food | Guidance |
|---|---|
| Fruit and vegetables | Good fit: BfR (2023) says wraps with added substances suit them |
| Fatty foods (cheese, sausage, cakes, pastries) | BfR (2023) recommends that wraps with added substances not be used. Beeswax-only wraps are a gray area, so use a plate or container if unsure |
| Raw meat, fish, poultry, eggs | Skip: BfR (2023) says wraps can’t be washed hot |
| Hot food | Skip: heat melts the wax |
Raw animal foods are out because of cross-contamination. A July 2011 USDA staff blog post on cross-contamination describes it as raw meat juices reaching other foods and advises washing kitchen cloths on the hot cycle, which a wax-coated cloth can’t take. Plant foods carry lower but not zero risk, per BfR (2023). Keeping wraps to suitable foods also avoids ruined wraps and wasted effort.
Who should skip: Infants and immunocompromised eaters should skip wraps. Ask their clinician, or use a plate or lidded container. This is general information, not medical advice.
Do You Need Jojoba Oil or Resin? Why DIY Beeswax Wrap Recipes Disagree
Three recipes, three different answers. Here’s why, and which path is simplest.
You can make beeswax wraps without jojoba oil and without resin, and BfR (2023) advises against jojoba. BfR says jojoba adds softness and keeps wax from turning brittle, so beeswax-only wraps may feel stiffer, which SustainCents hasn’t tested. Leaving both out saves two purchases.
| Question | What home recipes say | Regulator view | Simplest path |
|---|---|---|---|
| Heat | About 150°F to 300°F | None found | Lowest setting that melts your wax; check the SDS |
| Jojoba oil | Some include it; one skips it | BfR: not recommended (2023) | Leave out |
| Resin | Some include it | BfR cautions on added substances for fatty foods, likely covering resin (SustainCents’s reading) | Leave out |
| Wax grade | Some say cosmetic grade is fine | BfR: food-additive purity (2023); Finnish Food Authority: pesticide residues, adulteration (2023) | Food-grade, purity stated |
| Lifespan | Roughly 6 to 12 months to several years | None | Don’t promise; replace by condition |
The disagreement itself is the finding.
What Do DIY Beeswax Wraps Really Cost? A Fill-In Formula
Before you buy a bag of wax, count how many wraps you’d actually use. A plate over a bowl or a lidded container you already own costs $0.
Prices are US dollars and vary by retailer and region, and set sizes vary, so check what is in the pack.
| Input | Value | Source or status |
|---|---|---|
| Wax per 12 by 12 inch wrap | 0.4 to 1.0 oz | Illustrative, home recipes |
| Wax price per oz | You enter it; hypothetical $1 to $3 | Hypothetical |
| Clearance price per wrap | $4.60 ÷ 3 = $1.53 | SustainCents zero waste kitchen swaps roundup, October 5, 2026 |
- Cost per wrap = (oz per wrap × price per oz) + fabric cost.
- Break-even wraps = package price ÷ store price per wrap; also check package oz ÷ oz per wrap.
The hypothetical cost to make beeswax wraps is $0.40 to $3.00 per wrap (0.4 oz × $1 to 1.0 oz × $3). That beats the $4.60 clearance 3-pack only below $1.53 per wrap.
Illustrative, not a promise: 8 oz of wax at $16 is $2.00 per oz. At 0.5 oz per wrap, that’s $1.00 each for 16 wraps. Against clearance, $16 ÷ $1.53 is just over 10, so 11 wraps. At 1 oz per wrap, 8 wraps cost $2.00 each and never beat clearance.
Skip it if you rarely use plastic wrap (see reducing plastic use in the kitchen for other changes), mostly cover raw meat or hot food, or the math says no. Time, oven energy and extra supplies are unpriced.
How to Wash, Refresh and Retire Your Beeswax Wraps
You’ve used the same wrap for months. How do you know it’s done?
Wash and dry
Wash wraps in cool water with mild soap, then let them air dry. Skip hot water, because the coating melts and BfR (2023) says wraps can’t be cleaned hot.
Refresh an older wrap
Here’s how to refresh beeswax wraps: re-melt the wax briefly in the oven, or press it with an iron between two sheets of parchment, steam off. Use the same heat and safety rules as steps 2 to 4. Refreshing stretches the wax you already paid for.
Know when to retire it
Retire a wrap when the wax is cracked or flaking, the fabric tears, stains or odors stay, or it has touched raw animal food. SustainCents can’t say how long beeswax wraps last, because that depends on use and care.
Gifting note
A recipient won’t have read this article, so include a care card. A handmade set only saves money if you already own the materials and have the time, a trade-off the SustainCents low-waste holiday tips also point out.
Care card
- ☐ Wash in cool water
- ☐ Air dry
- ☐ Use on plant foods
- ☐ Keep away from heat
Should You Make DIY Beeswax Wraps? Your Next Step.
The simplest recipe is undyed cotton and food-grade beeswax, nothing more. Keep DIY beeswax wraps to plant foods. Run the math before you spend anything on wax.
Next, track how much plastic wrap you use for a week, then choose to skip, buy a clearance set or make your own. The one-week waste audit in The Complete Zero Waste Kitchen Guide is an easy way to see how much plastic wrap you actually go through.
DIY Beeswax Wraps: Quick Answers
Not with wraps that contain added substances. BfR (2023) advises against those wraps for fatty foods such as cheese. It judged wax transfer from beeswax-only wraps acceptable when the wax meets EU food-additive purity rules, which aren’t US rules. If you’re unsure, use a plate or container.